Teaching & Using Technology at SiS

Work time:
began on October 6th
(about 9 weeks)

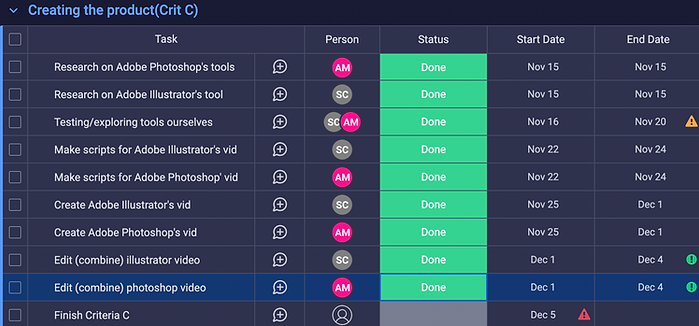
Gantt Chart timeline (Criteria C)
last updated: December 3rd

Success Criteria– Changes made along the way (Criteria C)
-
"Create 1 video for each tool in Adobe Illustrator, Adobe Photoshop. Overall, there will be 7 videos since the Burn tool and Dodge tool are merged together in 1 video."
-
Originally, we have decided that we will be focusing on Shear tool, Width tool, Scissor tool, and Mesh tool. However, we eliminated the Mesh tool as one of the focused tools as a result due to its complexity of explanation, as the tool required some layering techniques. While in the process of testing/exploring Adobe Illustrator and Adobe Photoshop tools ourselves to understand how to explain and demonstrate each tool, the second success criteria, we realized the Mesh tool’s high complexity of understanding. Moreover, as the Width tool and the Mesh tool were equally the second most voted tools in our primary research, we decided that the Width tool could be a better tool to focus on since it could be used more commonly. Despite the fact that we wanted to make tutorial videos based on our best reliable knowledge, Mesh tool ended up not being one of our focused tools for our final design’s tutorial videos.
-
-
"Explanations for each tool should be about 5 to 7 minutes, no longer than 7 minutes."
-
Initially, we have considered/predicted each tutorial video to take up to about 5 to 7 minutes, no longer than 7 minutes, predicting a longer time arrangement just in case. Although we had successfully met part of this criteria by making our video no longer than 7 minutes, each of our videos were just about 2 to 4 minutes. This was because we aimed for simple and easy-understanding tutorial videos for student’s convenience, we decided to only make our tutorial videos to a maximum of 4 minutes. Overall, this change had great influence on our final design, as our videos turned out to be just simple and easy to understand, with introduction, function, example with demonstrations, and a conclusion.
-
☆Final Design Products (Solution to our design project) ☆
Tutorial Videos for each tool in Adobe Illustrator/Photo will consist of timestamps included in each video’s description, when uploaded on YouTube.
Though for now, these videos are uploaded in a shared drive until we have tested out our final projects by 10 people in our grade, using a google survey.
Adobe Illustrator:
Photoshop:
Our Success Criteria
The design project should not be time consuming, therefore when presenting to audiences, the design should not be longer than 7 minutes.
MET
(It was justified by all of our tested audience that our videos were not time consuming, and all under 7 minutes.)
We will send out a survey and at least 10 people should respond. Within those 10 people, 60% of the tested audience should agree that the product was beneficial for learning Adobe.
MET
(As a result, our final project was trialed by 11 students in 9th grade Seisen, and over 70% of the tested audience had agreed that the product was beneficial for learning Adobe. )
If the design project is in digital format, the file of our project should not exceed 900MB for the file.
MET
(Each of our tutorial videos were about 700MB for the file.)
The project should have been tested by at least 10 people for it to be considered “tested,” or been “trialed.”
MET
(It was justified since 11 freshman in Seisen have viewed at least one our tutorial videos in order to provide us with feedbacks through a feedback survey.)
All the people being tested by our solution should answer in the google survey that they at least learned one new thing about adobe from our presentation(s.)
MET
(As a result, we received 11 feedback surveys from 9th graders in Seisen that helped test/trialed our final product. )
Test Summary (Criteria D- i&ii)
-
A summary of our testing methods & why we chose those methods referring to our success criteria
-
As a result of our completed design product, our initial success criteria aimed to be tested/trialed by 10 students of Seisen International school high schoolers. However, our feedback form was able to reach 11 students, in 9th grade, which was beyond our success criteria. For our testing method, we sent out a link to our shared drive that consisted of 3 Adobe Illustrator’s tutorial videos, and 4 other Adobe Photoshop’s tutorial videos to students. Thus, we informed them to choose video(s) of their own choice to view, and later fill up a feedback survey based on their opinion. The reason why we chose this testing method is for the convenience and simplicity to access the videos, and also because students are able to watch a tutorial video that discusses a specific tool that they struggle with using, or are interested in learning about. Hence, by using feedback forms, we are able to ask simple questions referring to our success criteria goals, with easy responses such as ratings, votings, or multiple answer choice questions. For instance, one of our success criteria is to test if 60% of students; 6 students feel as though they were able to learn at least one thing about Adobe from these tutorial videos, therefore we asked whether or not there were minimum of one thing new that they learned from the tutorial videos, and provided few guiding questions for them to vote on.
-
-
How our final product will be presented to our audience, high school students in Seisen International School
-
Although we took some time to decide the best way to present our tutorial videos, as a result, we decided to create a shared drive that consists of all the tutorial videos, and have them uploaded under the academic page’s news, on the Seisen website after consulting with teachers. The reason why we chose to include our tutorial videos under the academic page’s news is because this page includes articles written by students that teach skills and techniques related to academic fields for other students. A news article written by a senior named Dean Bevan, “How to stop procrastinating and how to motivate yourself to study for the IB DP exams”, is one article which highlights the steps on how to stop procrastinating for IB DP exam’s studying for current 11-12 grade students in Seisen. Hence, we thought that this was the perfect place to include our tutorial videos for all grade levels in high school to learn about the usage of Adobe Illustrator and Photoshop. Another way we will be presenting our tutorial videos is to upload them on YouTube, for easier access and also for students to have timestamps, as it is available under each videos’ description.
-
-
Results of our tests and evaluations of our product’s performance on the tests
-
Visual and verbal understanding per tutorial videos
-
Firstly, we asked if students had the freedom to choose a video of their own choice, and 100%; all students answered that they were able to. In our feedback survey, it was asked to look for ratings from 1 to 10 of our videos’ visual and verbal understanding levels. Hence, from the answers we received, it was clear that 80% of the students rated visual understanding to be about 9-10, and verbal understanding was rated between 9-10 by 70% of the students. Moving on to Adobe Photoshop, it was clear that 90% of students rated the verbal understanding of tutorial videos to be level 9-10, and 80% of students rated the visual understanding to be level 9-10. Moreover, it is clear that more than 70% of students rated Adobe Illustrator, and Photoshop’s tutorial videos were successful at providing a clear verbal and visual understanding, around the level of 9-10 out of 10.
-
-
Opportunities for students to choose a video of their own choice to provide feedbacks
-
As a result, all 11 students answered yes to this question, informing us that they were able to choose a video of their own choice to view. This was our goal for our overall project; to provide tutorial videos that can be suitable for individual students’ choice and liking.
-
-
Whether or not tutorial videos brought a minimum of one new knowledge of Adobe Illustrator/Photoshop’s tools to students.
-
This was one of our aimed success criteria, for all students tested to be able to learn at least one thing new from these tutorial videos. Therefore, provided answer guides such as statements such as, “Yes, there were tutorial videos about tool(s) that I needed to learn about.”, “There were no videos that are about specific tools that I needed to learn about.”, and so on for students to vote on a specific answer that they relate to. Hence, all 11 students voted that tutorial videos of tools were something they needed to learn about. This shows that we were able to meet our success criteria for the final product.
-
-
Justification of required video structures
-
Despite the fact that this question was dedicated to our final product’s sketch diagram, we had asked questions that justified our requirements for our video structures. This included an introduction, and an explanation and example of the tool, and a final conclusion. As a result, all students answered that all tutorial videos consisted of all these elements.
-
-
Maximum video length
-
This video is for our aimed success criteria, for each video to be no longer than 7 minutes, and not time consuming for students. Correspondingly, all 11 students said that all videos were under 7 minutes, and hence not time consuming.
-
-
Final Reflection/Testing (Criteria D)
-
What is one thing you feel you did well in implementing the Design Cycle during this project?
-
One thing that I feel I did well on when implementing the Design Cycle during this project was justifying a testing summary of our final product. To be specific, I was capable of outlining the reasons why we have chosen to use these testing methods, such as for its convenience for our audience to easily answer a feedback form, but also whether or not we have met our success criteria looking at our generated data, which was evidently proved as we had for 70% or more students had come across to agree upon that our tutorial videos were beneficial for learning about Adobe. By being able to justify our testing methods to be the most suitable for our target audience and how it applies to our success criteria, it helps bring together our design project to be well put together and appropriate for our target audience. All in all, I think I was able to justify our testing methods to be the most effective, and also successfully reflect whether or not our design product has met our success criteria using the testing results.
-
-
What is one thing that you would like to work on and improve for your next design project?
-
When working towards my next design project, there are a few things that I would like to work to improve on. One thing is splitting up a reasonable amount of work between me and my partner, for an equal amount of credits. This is because while working towards this project, I wasn't able to display an equal amount of work compared to my partner, such as for the design specification. In addition, this resulted in receiving different grades between the two of us, which wasn’t ideal as a partner. Furthermore, the next time I work with a partner or a group in design projects, or any other projects, I would like to pay attention to the works assigned between one another, to avoid frustration of not being able to take equal parts of work and not receiving the same credits. Another thing I would like to improve on next time is increasing more diverse perspectives for our final product’s testing. What I mean by that is being able to collect different opinions from different people in the target audience we’ve decided upon already. In this project, although our target audience are all high school students, all of our tested audience was from our own grade; grade 9. Thus, it would’ve been better to collect different opinions among people from all/different grades in order for our final product to precisely qualify as a suitable one for ALL high school students. Therefore, preparing additional time for reaching out for more perspectives when testing a design project would be another important factor to focus on in the next design project.
-